
Log in to the homepage www.easyhunt.com. If you don't have an account, click on "become a member for free" and continue from there. When you have logged in, click on "Profile" at the top right and then "eTrack dog trackers". Then click "Add eTrack" and fill in the tracker's name and IMEI number. The tracker's IMEI number must always be filled in. You will find the number printed on the tracker. Only the owner of the eTrack can put in the IMEI number. A list of your hunting teams will appear. Choose in which teams you wish to display your eTrack, and which dog you will use. This can be changed at any time. Info regarding the dogs is found in respective team's members list. If you link your eTrack to a specific dog, the dog's name, picture and other data will be shown in the app. If you don't, the name of the eTrack will be shown instead. All members and guests of the hunting team(s) to which your eTrack has been connected, will be able to see the dog's position in the Easyhunt App.
To use the tracker,an ETRACK+ subscription is required. You will find it under menu "Order". If you already have an ETRACK+ subscription for an old tracker that you no longer intend to use, delete this tracker from your profile > eTrack trackers. You will then be able to move your ETRACK+ subscription to your new tracker. It is the only subscription you need if you are the sole person intended to view the tracker.
If you are the sole user of the tracker and your only requirement is the basic hunting map with your dog's trail and position displayed, you don't need a hunting team on Easyhunt.
If you want to be able to mark stands and view symbols and boundaries, create a new hunting team with yourself as the sole member and connect the tracker to that team. As long as you are the sole member it is free. If you invite additional members the TEAM subscription is required.
When you create a new hunting team click on "Map">"Edit" and mark your hunting ground using the "Hunting ground">"New hunting ground" buttons. This will enable you to set out stands etc, and if you are hunting in Sweden, you can view property boundaries relevant to your hunting grounds.
Other teams who wish to track your dog must have a TEAM subscription and need to invite you as a member or guest.
Download the Easyhunt App for iPhone or Android. If you already have the App, please ensure that it is updated to the latest version. Log in using your username and password. Go to the map view by clicking on the map symbol.
NOTE:Before using it for the first time, charge the tracker for at least 8 hours. The battery will reach its full capacity potential when it has been fully drained and charged five times
The charging Puck flashes Green to indicate that it is charging. A solid Green light indicates that it is fully charged.
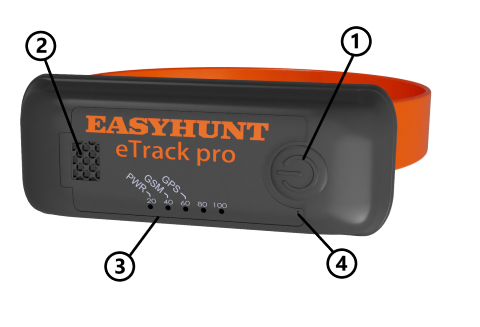
To check the battery charge level, press the Power Button and the white lights will start to flash but release the button before all the lights light up. The battery charge level will be indicated by the green lights from 20 - 100% charge. If the charge is below 20% a red light will show. In such case, charge the tracker for at least 8 hours
If the tracker is switched off, press and hold the power button until 5 purple lights flash and the tracker vibrates. The eTrack pro is now switched on. The tracker is switched off in a similar manner. Before it switches off red lights will flash a number of times. If the eTrack is switched on but has been immobile for one minute, it will switch to sleep mode to save battery
When the eTrack is powered on and active, there are three indicators which are cycled through every 5 seconds.
PWR (Battery indicator) Blue = tracker is switched on, Red = power low, double Red = critically low power.
GSM (Mobile connection) At start up the GSM light will flash Green while searching for a network and double Purple flash when connected. It will flash Red if a mobile signal cannot be found and double Red if it has not been connected with the Easyhunt server for 90 seconds. In that case, first ensure that the tracker is outdoors and under open sky. If that does not help, re-start the tracker. If triple or quadruple Red lights are flashing there is a fault in the SIM card and you need to contact Easyhunt Support. WARNING: Do not open the tracker yourself. You cannot replace the SIM card.
GPS (GPS satellite connection): At start up the GPS light will first flash Orange whilst the tracker is searching for GPS satellites. If the GPS light flashes Red the tracker has failed to connect with any satellite. It flashes Blue if it has locked on to four or fewer satellites. This will provide a location that is not exact. A Cyan (light blue-green) flash indicates a reliable GPS lock on to five or more satellites which will give a precise location. This normally requires that the tracker is outdoors under open sky
Green Flash “Bar Graph” indicates battery level.
Green Scrolling of all LED’s indicates unit is charging.
Red Scrolling of all LED’s indicates charging but the battery level is extremely low and is in recovery mode.
Blue LED Flash every 2 seconds indicates device is on and ready.
Single Green LED Flash with the Blue Flash every 2 seconds indicates the device is charging.
Double Green indicates device is fully charged.
Single Red LED Flash indicates the Low Battery Warning.
Double Red LED Flash indicates the Battery is critically low and device will power down unless connected to charger.
Green Flash indicates searching for network.
Blue Flash indicates the device is logged onto home network, but not communicating with the server.
Purple Flash indicates communicating with the server on home network.
Double Blue Flash indicates the device is logged onto a roaming network but not communicating with the server.
Double Purple flash indicates communicating with the server on roaming network.
Red Flash indicates no signal.
Orange Flash indicates device is searching for satellites.
Red Flash indicates no GPS Lock.
Blue Flash indicates GPS Lock (< 4 Satellites).
Cyan Flash indicates GPS Lock (> 5 Satellites).
GSM LED - Double Red Flash indicates no server connection in the last 90 seconds.
GSM LED - Triple Red Flash indicates Network Registration Failure.
GSM LED - Four Red Flashes indicates SIM Error.